
linux查看双网卡绑定模式,Linux中双网卡绑定实现的各种模式


一、Linux中双网卡绑定实现的原理
I. Rationale for the completion of binary cards in Linux
Linux双网卡绑定实现就是使用两块网卡虚拟成为一块网卡;linux设置bond网卡绑定---有些用。
Linux double-net card binding is achieved by using two net cards to virtualize it as a net card; linux sets the Bond card binding -- some for use.
Linux双网卡绑定实现就是使用两块网卡虚拟成为一块网卡,这个聚合起来的设备看起来是一个单独的以太网接口设备,
Linux double-net card binding is achieved by using two net cards to virtualize it into a net card xff0c; this unit, which aggregates, appears to be a separate #xff0c ;
通俗点讲就是两块网卡具有相同的IP地址而并行链接聚合成一个逻辑链路工作。其实这项 技术在Sun和Cisco中早已存在,
The popular point is that two web cards have the same IP address and parallel links work together into a logical link. In fact, this technology already exists in Sun and Cisco & #xff0c;
被称为Trunking和Etherchannel技术,在Linux的2.4.x的内核中也采用这这种技术,被称为bonding。
It is known as Trunking and Etherchannel Technologies & #xff0c; it is also used in the kernel of Linux in 2.4.x & #xff0c; it is known as Bonding.
bonding技术的最早应用是在集群——beowulf上,为了提高集群节点间的数据传输而设计的。下面我们讨论一下bonding 的原理,
The earliest application of the binding technology is in the cluster -- beowulf & #xff0c; designed to improve data transfer between cluster nodes. Let's discuss the principles of the binding.
什么是bonding需要从网卡的混杂(promisc)模式说起。我们知道,在正常情况下,网卡只接收目的硬件地址(MAC Address)是自身Mac的以太网帧,
What the binding needs to start with is the mix of web cards. We know that & #xff0c; & #xff0c under normal circumstances; the netcard only receives the target hardware address (MAC Address) is its Mac's #xff0c.
对于别的数据帧都滤掉,以减轻驱动程序的负担。但是网卡也支持另外一种被称为混杂promisc的模式,可以接收网络上所有的帧,
Filtering & #xff0c for other data frames; alleviating the burden of drivers. But the webcard also supports another model called mixed promisc & #xff0c; it can receive all frames on the network & #xff0c;
比如说tcpdump,就是运行在这个模式下。bonding也运行在这个模式下,而且修改了驱动程序中的mac地址,将两块网卡的Mac地址改成相同,
For example, tcpdump, that's running under this mode. Bonding also runs under this mode & #xff0c; and has modified the mac address & #xff0c of the driver; and changes the Mac address of the two web cards to the same xff0c;
可以接收特定mac的数据帧。然后把相应的数据帧传送给bond驱动程序处理。
You can receive a specific mac data frame. You can then transmit the corresponding data frame to the Bond driver for processing.
说了半天理论,其实配置很简单,一共四个步骤:
A half-day theory & #xff0c; a simple configuration & #xff0c; four steps & #xff1a;
实验的操作系统是Redhat Linux Enterprise 3.0
The experimental operating system is Redhat Linux Enterprise 3.0.
绑定的前提条件:芯片组型号相同,而且网卡应该具备自己独立的BIOS芯片。
Preconditions for binding xff1a; the same chip group type xff0c; and the net card should have its own independent BIOS chip.
1.编辑虚拟网络接口配置文件,指定网卡IP
1. Edit virtual network interface configuration files and specify web card IP
vi /etc/sysconfig/ network-scripts/ ifcfg-bond0
[root@rhas-13 root]# cp /etc/sysconfig/network-scripts/ifcfg-eth0 ifcfg-bond0
2 #vi ifcfg-bond0
将第一行改成 DEVICE=bond0
For first line read DEVICE #61; Bond0
# cat ifcfg-bond0
DEVICE=bond0
BOOTPROTO=static
IPADDR=172.31.0.13
NETMASK=255.255.252.0
BROADCAST=172.31.3.254
ONBOOT=yes
TYPE=Ethernet
这里要主意,不要指定单个网卡的IP 地址、子网掩码或网卡 ID。将上述信息指定到虚拟适配器(bonding)中即可。
Here's the idea xff0c; do not specify an IP address, subnet mask or netcard ID for a single web card. Assign this information to the virtual adapter (bonding).
[root@rhas-13 network-scripts]# cat ifcfg-eth0
DEVICE=eth0
ONBOOT=yes
BOOTPROTO=dhcp
[root@rhas-13 network-scripts]# cat ifcfg-eth1
DEVICE=eth0
ONBOOT=yes
BOOTPROTO=dhcp
3 # vi /etc/modules.conf
编辑 /etc/modules.conf 文件,加入如下一行内容,以使系统在启动时加载bonding模块,对外虚拟网络接口设备为 bond0
Edit /etc/modules.conf files & #xff0c; add the following rows & #xff0c; to load the system with the binding module & #xff0c at startup; external virtual network interface devices are Bond0
加入下列两行
Add the following two rows
alias bond0 bonding
options bond0 miimon=100 mode=1
说明:miimon是用来进行链路监测的。 比如:miimon=100,那么系统每100ms监测一次链路连接状态,如果有一条线路不通就转入另一条线路;
Description xff1a; miimon is used for connection monitoring. For example: miimon61; 100xff0c; then the system monitors the chain connection status xff0c per 100 ms; if one line is not connected to another xff1b;
mode的值表示工作模式,他共有0,1,2,3四种模式,常用的为0,1两种。
The value of the mode of work is xff0c; he has a total of 0xff0c; 1,2,34xyff0c; the usual is 0,1.
mode=0表示load balancing (round-robin)为负载均衡方式,两块网卡都工作。
Mode & #61; 0 meansloading (round-robin) is load equilibrium & #xff0c; both webcards work.
mode=1表示fault-tolerance (active-backup)提供冗余功能,工作方式是主备的工作方式,也就是说默认情况下只有一块网卡工作,另一块做备份.
Mode & #61; 1 means Fault-tolerance (active-backup) provides redundant functions & #xff0c; the method of work is the main mode of work, which means, by default, only one net card works and the other back up.
bonding只能提供链路监测,即从主机到交换机的链路是否接通。如果只是交换机对外的链路down掉了,而交换机本身并没有故障,
Bonding can only provide links to monitor & #xff0c; i.e., whether the links from the mainframe to the switch link are connected. If only the switch is off & #xff0c; the switch itself does not fail & #xff0c;
那么bonding会认为链路没有问题而继续使用
Well, then the binding will think the link's okay and continue to use it.
4 # vi /etc/rc.d/rc.local
加入两行
Add two lines
ifenslave bond0 eth0 eth1
route add -net 172.31.3.254 netmask 255.255.255.0 bond0
到这时已经配置完毕重新启动机器.
By that time, the reboot machine had been configured.
重启会看见以下信息就表示配置成功了
When you reboot, you see the following information, it means the configuration's done.
................
Bringing up interface bond0 OK
Bringing up interface eth0 OK
Bringing up interface eth1 OK
................
下面我们讨论以下mode分别为0,1时的情况
And here's what we're talking about.
mode=1工作在主备模式下,这时eth1作为备份网卡是no arp的
Mode #61; Task 1 is in the main mode and Eth1 is no arp
[root@rhas-13 network-scripts]# ifconfig 验证网卡的配置信息
[root@ rhas-13 network-scripts]#ifconfig
bond0 Link encap:Ethernet HWaddr 00:0E:7F:25
9:8B
inet addr:172.31.0.13 Bcast:172.31.3.255 Mask:255.255.252.0
UP BROADCAST RUNNING MASTER MULTICAST MTU:1500 Metric:1
RX packets:18495 errors:0 dropped:0 overruns:0 frame:0
TX packets:480 errors:0 dropped:0 overruns:0 carrier:0
collisions:0 txqueuelen:0
RX bytes:1587253 (1.5 Mb) TX bytes:89642 (87.5 Kb)
eth0 Link encap:Ethernet HWaddr 00:0E:7F:25
9:8B
inet addr:172.31.0.13 Bcast:172.31.3.255 Mask:255.255.252.0
UP BROADCAST RUNNING SLAVE MULTICAST MTU:1500 Metric:1
RX packets:9572 errors:0 dropped:0 overruns:0 frame:0
TX packets:480 errors:0 dropped:0 overruns:0 carrier:0
collisions:0 txqueuelen:1000
RX bytes:833514 (813.9 Kb) TX bytes:89642 (87.5 Kb)
Interrupt:11
eth1 Link encap:Ethernet HWaddr 00:0E:7F:25
9:8B
inet addr:172.31.0.13 Bcast:172.31.3.255 Mask:255.255.252.0
UP BROADCAST RUNNING NOARP SLAVE MULTICAST MTU:1500 Metric:1
RX packets:8923 errors:0 dropped:0 overruns:0 frame:0
TX packets:0 errors:0 dropped:0 overruns:0 carrier:0
collisions:0 txqueuelen:1000
RX bytes:753739 (736.0 Kb) TX bytes:0 (0.0 b)
Interrupt:15
那也就是说在主备模式下,当一个网络接口失效时(例如主交换机掉电等),不回出现网络中断,
That means that, in the main mode, when a network interface fails (e.g., when the main switch is out of power), no network interruptions occur.
系统会按照cat /etc/rc.d/rc.local里指定网卡的顺序工作,机器仍能对外服务,起到了失效保护的功能.
The system works in the order in which the net card is assigned in cat/etc/rc.d/rc.local, and the machine is still available for external service and has failed to protect itself.
在mode=0 负载均衡工作模式,他能提供两倍的带宽,下我们来看一下网卡的配置信息
At mode #61; 0 load-balanced mode of work, he can provide twice the bandwidth. Let's look at the configuration of the Internet card.
[root@rhas-13 root]# ifconfig
bond0 Link encap:Ethernet HWaddr 00:0E:7F:25:D9:8B
inet addr:172.31.0.13 Bcast:172.31.3.255 Mask:255.255.252.0
UP BROADCAST RUNNING MASTER MULTICAST MTU:1500 Metric:1
RX packets:2817 errors:0 dropped:0 overruns:0 frame:0
TX packets:95 errors:0 dropped:0 overruns:0 carrier:0
collisions:0 txqueuelen:0
RX bytes:226957 (221.6 Kb) TX bytes:15266 (14.9 Kb)
eth0 Link encap:Ethernet HWaddr 00:0E:7F:25:D9:8B
inet addr:172.31.0.13 Bcast:172.31.3.255 Mask:255.255.252.0
UP BROADCAST RUNNING SLAVE MULTICAST MTU:1500 Metric:1
RX packets:1406 errors:0 dropped:0 overruns:0 frame:0
TX packets:48 errors:0 dropped:0 overruns:0 carrier:0
collisions:0 txqueuelen:1000
RX bytes:113967 (111.2 Kb) TX bytes:7268 (7.0 Kb)
Interrupt:11
eth1 Link encap:Ethernet HWaddr 00:0E:7F:25:D9:8B
inet addr:172.31.0.13 Bcast:172.31.3.255 Mask:255.255.252.0
UP BROADCAST RUNNING SLAVE MULTICAST MTU:1500 Metric:1
RX packets:1411 errors:0 dropped:0 overruns:0 frame:0
TX packets:47 errors:0 dropped:0 overruns:0 carrier:0
collisions:0 txqueuelen:1000
RX bytes:112990 (110.3 Kb) TX bytes:7998 (7.8 Kb)
Interrupt:15
在这种情况下出现一块网卡失效,仅仅会是服务器出口带宽下降,也不会影响网络使用.
In such a situation, a net card lapses, which merely reduces the bandwidth of the server's exports and does not affect the use of the network.
通过查看bond0的工作状态查询能详细的掌握bonding的工作状态
You can get details on the working status of the bonding by looking at the working status of the bond0
[root@rhas-13 bonding]# cat /proc/net/bonding/bond0
bonding.c:v2.4.1 (September 15, 2003)
Bonding Mode: load balancing (round-robin)
MII Status: up
MII Polling Interval (ms): 0
Up Delay (ms): 0
Down Delay (ms): 0
Multicast Mode: all slaves
Slave Interface: eth1
MII Status: up
Link Failure Count: 0
Permanent HW addr: 00:0e:7f:25:d9:8a
Slave Interface: eth0
MII Status: up
Link Failure Count: 0
Permanent HW addr: 00:0e:7f:25:d9:8b
QuickLinux AS4 下网卡绑定实现负载均衡和失效保护
QuickLinux AS4 untied load balance and failed protection
Linux下的的负载平衡(说白了就是n块网卡邦定在一起当一个用速度变成原来的n倍)在linux下叫做bonding,理论就不说了,网上一大堆.网 上也有好多这样的文章但是大多都和实际配置过程有些不同,下面说说在2.6内核的quicklinux AS4 上具体的实现方法。
Under Linux, the load balance (which means N Netca Bonding together when a speed becomes the original n-fold) is called bonding under Linux, and the theory goes without saying that there are a lot of these articles on the net, but most of them are different from the actual configuration #xff0c; here's the specific method of achieving QuickLinux AS4 on the 2.6 kernel.
第一步、编辑虚拟网络接口配置文件。
The first step is to edit the virtual network interface configuration file.
建立 /etc/sysconfig/network-scripts/ifcfg-bond0 文件
Create /etc/sysconfig/network-scripts/ifcfg-bond0 files
内容如下:
xff1a;
DEVICE=bond0
IPADDR=192.168.0.1
NETMASK=255.255.255.0
BROADCAST=192.168.0.255
NETWORK=192.168.0.1
ONBOOT=yes
ip地址根据自己的需要配置(一个简单的方法就是拷贝一个ifcfg-eht0修改DEVICE=bond0)
The ip address is configured according to its own needs (a simple way is to copy an ifcfg-eht0 to modify DEVICE= bond0)
第二步、编辑真实网卡的配置文件(建议修改之前做好备份)
Step two, edit the configuration file for the real web card (record before suggesting changes)
/etc/sysconfig/network-scripts/ifcfg-eth*
内容如下
Here's the thing.
BOOTPROTO=none
TYPE=Ethernet
DEVICE=eth* (*与那个配置文件名中的相同)
DEVICE=eth* (* same as in the profile name)
ONBOOT=yes
MASTER=bond0
slave=yes
注意:真实网卡不能再设置ip地址了,按需要把所要绑定的真实网卡都按这个设置,主要是MASTER=bond0 和 slave=yes 一定不要弄错(简单的方法就是修改一个然后拷贝再修改)
Note & #xff1a; real Internet cards can no longer have an ip address & #xff0c; real Internet cards to be tied as necessary are set & #xff0c; mainly MASTER& #61; bond0 and slave= yes must not be mistaken (the simple way is to change one and then copy)
第三步、修改/etc/modprobe.conf 文件加入如下两行(建议做好备份)
Step 3, amend/etc/modprobe.conf Add the following two lines (recommends backup)
alias bond0 bonding
options bond0 miimon=100 mode=0
注:1、miimon 是链路监测的时间间隔单位是毫秒,miimon=100的意思就是,每100毫秒检测网卡和交换机之间是否连通,如不通则使用另外的链路。
Note & #xff1a; 1, miimon is the time interval for chain monitoring in milliseconds & #xff0c; miimon= 100 means & #xff0c; xff0c per 100 millisecond test for connection between network cards and switches & xff0c; use a different link if not.
2、mode=0 表示负载均衡方式,两块网卡都工作。
2. Mode #61; 0 means load balance & #xff0c; both webcards work.
mode=1 表示冗余方式,网卡只有一个工作,一个出问题启用另外的。
Mode=1 means redundancy & #xff0c; the netcard has only one job & #xff0c; one problem opens another.
第四步、在/etc/rc.d/rc.local 加入如下一行(启动时执行此行命令)
Step 4, insert the following line in/etc/rc.d/rc. local (execution of this line at startup)
ifenslave bond0 eth0 eth1 …… eht*
重新启动后负载平衡已经能正常工作。
Once the load balance is restarted, it's working.
但是还有需要注意的,就是shorewall防火墙的设置,这个设置最好在配置负载平衡前进行,因为 shorewall在webmin下配置最简单,
But there are also xff0c, which needs to be noted; the shorewall firewall settings xff0c; this is better done before the configuration load balance xff0c; because shorewall sets the simplest xff0c under webmin;
负载平衡启动后原来的设置的“网卡界面”里面的网卡就应该由eht* 改成了bond0 了 。不改设置全部通讯都会断掉。
The network card in the "netcard interface" originally set after load balance is activated should have been changed from the eht* to the Bond0. All communications will be broken if the settings are not changed.
用service shorewall stop 也不能停掉防火墙,因为shorewall关掉后它就会启动“关闭规则(routerstopped)”。“关闭规则”默认的是不允许任何通讯。
The firewall & #xff0c cannot be stopped with the service shorewall stop; since shorewall shuts off, it starts to “close rules” which, by default, do not allow any communication.
所以建议在配置负载平衡前建立防火墙规则。否则只能通过手工来改shorewall的配置文件了。
So it is recommended that firewall rules be created before the load balance is configured. Otherwise, you can only change the configuration file of the shorewall manually.
以上的实现方法已经在QuickLinux as4 2.6.11-8内核下实现,网卡为双intel pro1000 速度相
The above approach has been achieved under QuickLinux as4 2.6.11-8 & #xff0c; webcards are double-intel pro1,000 velocity phase
当令人满意,服务器双网卡和两台客户计算机所都连接到同一个普通交换机上,两台客户机网同时从
When xff0c is satisfactory; both server double-net cards and two client computers are connected to the same general exchange xff0c; two client networks are connected to both
SMB上用totle copy拷贝大文件速度都能达到10000KB/S以上。
The SMB can copy large files at a speed greater than 10,000 KB/S using totle copy.
Linux下双网卡绑定实现负载均衡
Linux sets the load balance on the double-net card.
我们在这介绍的Linux双网卡绑定实现就是使用两块网卡虚拟成为一块网卡,这个聚合起来的设备看起来是一个单独的以太网接口设备,通俗点讲就是两块网卡具有相同的IP地址而并行链接聚合成一个逻辑链路工作。其实这项技术在Sun和Cisco中早已存在,被称为Trunking和Etherchannel技术,在Linux的2.4.x的内核中也采用这这种技术,被称为bonding。
The Linux double-net card binding that we are presenting here is using two net cards to virtualize it as a web card & #xff0c; the unit that has been brought together appears to be a stand-alone web interface device & #xff0c; the popular point is that the two net cards have the same IP address and parallel links that work as a logical link. This technology already exists in Sun and Cisco xff0c; called Trunking and Ethharchannel technology xff0c; and it is also used in Linux's 2.4.x inner cores xff0c; known as bunding.
bonding技术的最早应用是在集群——beowulf上,为了提高集群节点间的数据传输而设计的。下面我们讨论一下bonding 的原理,什么是bonding需要从网卡的混杂(promisc)模式说起。我们知道,在正常情况下,网卡只接收目的硬件地址(MAC Address)是自身Mac的以太网帧,对于别的数据帧都滤掉,以减轻驱动程序的负担。但是网卡也支持另外一种被称为混杂promisc的模式,可以接收网络上所有的帧,比如说tcpdump,就是运行在这个模式下。bonding也运行在这个模式下,而且修改了驱动程序中的mac地址,将两块网卡的Mac地址改成相同,可以接收特定mac的数据帧。然后把相应的数据帧传送给bond驱动程序处理。说了半天理论,其实配置很简单,一共四个步骤: 实验的操作系统是Redhat Linux Enterprise 3.0。绑定的前提条件:芯片组型号相同,而且网卡应该具备自己独立的BIOS芯片。
The earliest applications of the bonding technology are in the cluster — beowulf & #xff0c; designed to improve data transfer between cluster nodes. Here we discuss the principles of the bonding, what needs to be said from the hybrid (promic) mode of the webcard. We know & #xff0c; under normal circumstances & #xff0c; the netcard only receives the intended hardware address (MAC Address) is its own mac & #xff0c; the other data sheets are filtered xff0c; the drivers are modified xf0c; the net also supports another model known as the hybrid & xff0c; it can receive all the pieces of the web & xx & ffpx; for example, tcppdpppppx#ffm; it is run under this mode df0c; and it has the same #0xkppmb; it has the same #kpmbps; it has the same & 0xmbps.
双网卡邦定的拓朴图
Two-wire kabundin's pok-puk-tu.
1.编辑虚拟网络接口配置文件,指定网卡IP:
1. Edit virtual network interface configuration files and specify web card IP:
vi /etc/sysconfig/ network-scripts/ ifcfg-bond0
[root@rhas-13 root]# cp /etc/sysconfig/network-scripts/ifcfg-eth0 ifcfg-bond0
2、#vi ifcfg-bond0
将第一行改成 DEVICE=bond0:
Replace the first line with DEVICE #61; Bond0:
# cat ifcfg-bond0
DEVICE=bond0
BOOTPROTO=static
IPADDR=172.31.0.13
NETMASK=255.255.252.0
BROADCAST=172.31.3.254
ONBOOT=yes
TYPE=Ethernet
这里要主意,不要指定单个网卡的IP 地址、子网掩码或网卡 ID。将上述信息指定到虚拟适配器(bonding)中即可。
Here's the idea xff0c; do not specify an IP address, subnet mask or netcard ID for a single web card. Assign this information to the virtual adapter (bonding).
[root@rhas-13 network-scripts]# cat ifcfg-eth0
DEVICE=eth0
ONBOOT=yes
BOOTPROTO=dhcp
[root@rhas-13 network-scripts]# cat ifcfg-eth1
DEVICE=eth0
ONBOOT=yes
BOOTPROTO=dhcp
3、# vi /etc/modules.conf
编辑 /etc/modules.conf 文件,加入如下一行内容,以使系统在启动时加载bonding模块,对外虚拟网络接口设备为 bond0.加入下列两行:
Edit /etc/modules.conf files & #xff0c; add the following rows & #xff0c; so that the system can load the binding module & #xff0c at start-up; add the following two rows to the external virtual network interface device:
alias bond0 bonding
options bond0 miimon=100 mode=1
当前的二进制安装与升级机制
Current binary installation and upgrade mechanism
redhat/fedora RPM rpm rpmbuild yum
debian? dpkg dpkg? apt
rpm? 的相关参数
Arguments associated with rpm?
--nodeps
--replacepkgs
--replacefiles
--force
--test
--nosignature
--prefix
--noscripts
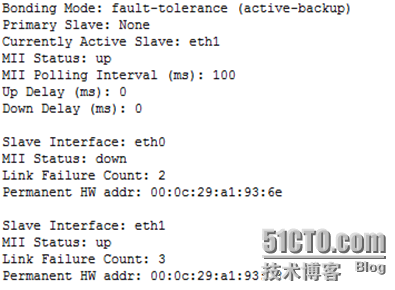
二、案例1? mode=1(注:mode=1表示fault-tolerance (active-backup)提供冗余功能,工作方式是主备的工作方式,也就是说默认情况下只有一块网卡工作,另一块做备份.)
II. Case 1? mode#61; 1 (note & #xff1a; mode#61; 1 means the result-tolerance (active-backup) provides redundancy & #xff0c; the method of work is the main mode of work, i.e. by default only one web card works and the other back up.)
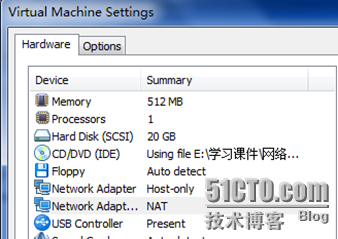
1、编辑虚拟机 给虚拟机添加一个网卡
1. Edit the virtual machine. Add a web card to the virtual machine.

网卡添加后该虚拟机拥有双网卡
The virtual machine has a double-net card when the net card is added.
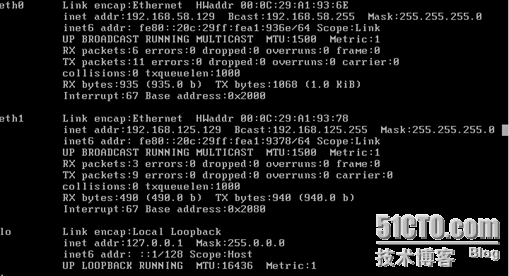
2、查看各网卡的ip地址
2. View the ip address of the web cards
4、给eth0配置临时ip地址
4. Configure temporary ip addresses for eth0

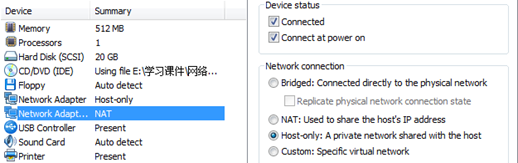
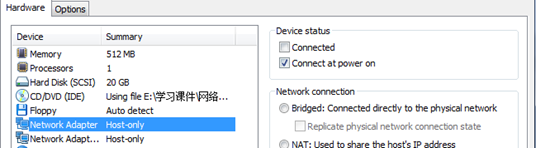
5、将双网卡均选择host-only方式连接
5. Connecting both webcards by host-only

6、切换到该目录下编辑eth0
6. Switch to Edit eth0 under the directory

编辑结果如下图所示
The results are shown in the figure below.

7、编辑eth1
7. Editor eth1

编辑结果如下图所示
The results are shown in the figure below.

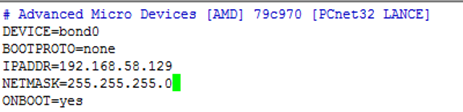
8、将ifcfg-eth0拷贝成ifcfg-bond0
8. Copy ifcfg-eth0 as ifcfg-bond0

编辑ifcfg-bond0 结果如下图所示
Edited ifcfg-bond0 results as shown in the figure below
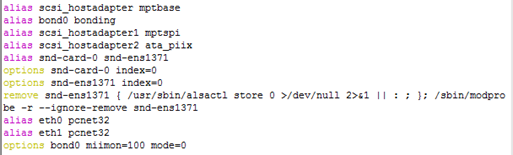
9、编辑模块配置文件
9. Edit Module Profiles

添加bond0和模块参数 结果如下图所示
Adding Bond0 and module parameters The results are shown in the figure below.

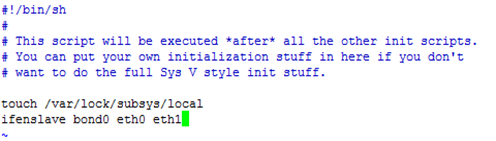
10、编辑rc.local
10, rc.local

将eth0和eth1绑定到bond0中
Tie eth0 and eth1 to Bond0.
11、重启系统
11. Reboot the system

下图结果中bond0、eth0、eth1的mac地址相同
Here's the same Mac address for Bond0, Eth0, Eth1.
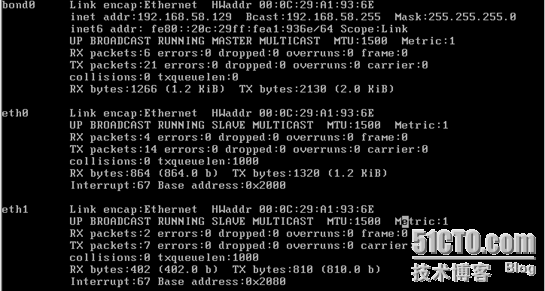
12、查看网卡信息
12. View information on the Internet card


测试
Test
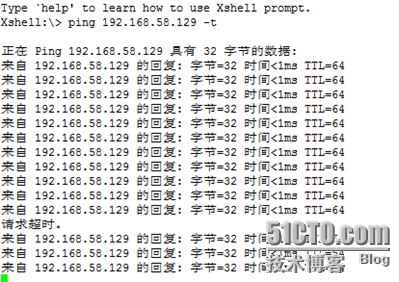
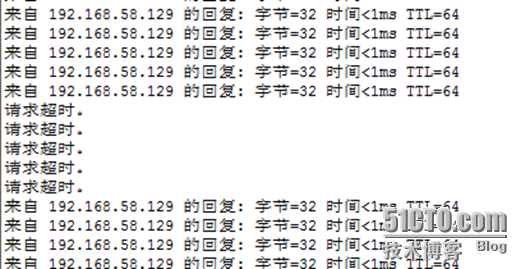
断开eth0
Disconnect eth0
断开eth0后 中间超时一次立即恢复正常
After the break-up of Eth 0, it's timed out in the middle to get back to normal immediately.
连接eth0后断开eth1无影响 一直为ping通状态
When you connect to eth0, you break eth1 without effect, and you've been in ping state.
eth0、eth1均断开 不能ping通
Eth0 and Eth1 are all disconnected.
断开eth0后网卡信息
Disconnect eth0 netcard information
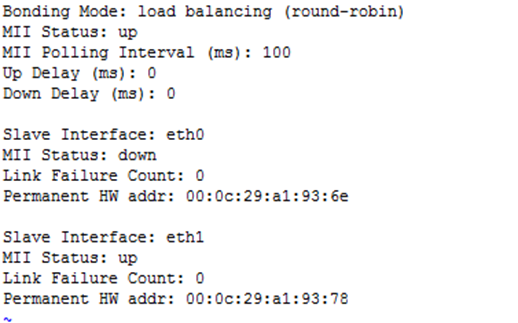
三、案例2? mode=0(注:mode=0表示load balancing (round-robin)为负载均衡方式,两块网卡都工作。)
Case 2? mode #61; 0 (note & #xff1a; mode & #61; 0 means laad balancing (round-robin) is load equilibrium #xff0c; both web cards work.
mode=0模式的配置步骤与mode=1配置步骤完全相同,只需将mode的值改为0即可 结果如下图所示
The configuration step for mode 0 is the same as for mode & #61; 1 configuration step is exactly the same & #xff0c; just change the value of mode to 0 is sufficient
测试
Test

断开eth0和eth1中任何一个网卡均正常平通,不会出现超时
Disconnect either eth0 or eth1 netcards are normally flattened #xff0c; no timeout occurs
断开eth1的网卡信息
Disconnect Eth1's webcard information

断开eth0的网卡信息
Disconnect eth0's webcard information
注册有任何问题请添加 微信:MVIP619 拉你进入群

打开微信扫一扫
添加客服
进入交流群
1.本站遵循行业规范,任何转载的稿件都会明确标注作者和来源;2.本站的原创文章,请转载时务必注明文章作者和来源,不尊重原创的行为我们将追究责任;3.作者投稿可能会经我们编辑修改或补充。