手把手教你如何使用RaaS创建Rollup


作者:A Fox;编译:深潮TechFlow
本文摘要:
Rollup as a Service (RaaS) 是一种新的商业模式,允许任何人在没有编码的情况下创建和部署自己的L2 Rollup。
Conduit 是一个非常易于使用的RaaS提供商,下面您将看到使用几次点击有多么快速简单地运行以太坊虚拟机(EVM)L2 Rollup。
当您的Rollup处于活动状态时,您可以将ETH桥接到其中并部署智能合约和dapp,例如,我创建了一个称为DOG的代币并将其转移。
Conduit 还为您设置了一个区块浏览器,因此您可以轻松地在链上可视化所有内容。
正文
由于以太坊主网变得过于缓慢和昂贵,因此我们看到了以太坊L2的增长,其中大部分是我之前讨论过的 Rollup。
要创建自己的Rollup,需要相对深入地理解区块链,但最近,"Rollup as a service"(RaaS)提供商的增长意味着您可以在几分钟内部署一个L2 Rollup,而无需编写一行代码!
本文,我将通过观察Conduit,稍微探讨一下RaaS的工作原理。
Rollups 和 RaaS
随着以太坊寻求扩展以每秒处理更多交易,第 2 层 (L2) 解决方案不断增长,我们在过去的文章中研究了 EVM L2。
Rollup 是今天以太坊上最受欢迎的L2类型。简要地提醒一下,Rollup 是一个单独的区块链,执行交易然后将Rollup 版本发布回主链。
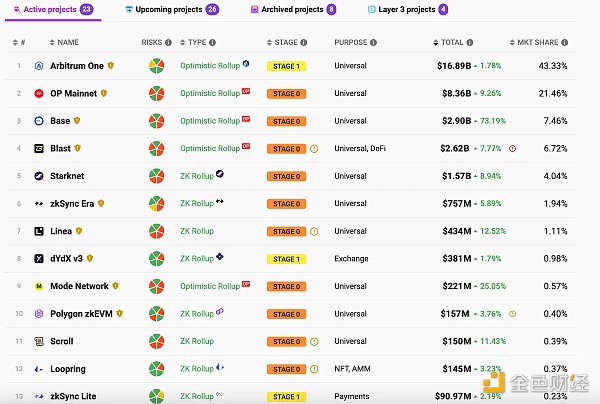
已经有成十上百的L2 Rollups的例子,如下图所示。
然而,尽管出现了诸如 Optimism 和 Arbitrum 这样的链,它们创建了自己的工具包以更快地创建L2,但创建自己的L2仍然不是一件小事,并且需要一定的技术知识。此外,您需要运行节点来支持L2,这也可能变得复杂。
这一挑战催生了一种新型的业务,即提供"Rollup as a Service"(RaaS)。通过RaaS,任何人都可以通过只需按几下按钮即可在几分钟内创建和部署自己的Rollup,然后开始将ETH桥接并在他们自己的L2上运行智能合约和dapp!
下面我将向您展示使用RaaS创建Rollup有多简单。
Conduit
RaaS 领域已经有很多竞争对手,包括 Astria、Caldera、AltLayer、 Conduit 等。
在本文中,我选择使用 Conduit,我发现它非常快速且易于入门。
按照他们的说法,Conduit 允许您:"在几分钟内部署一个Rollup,而不是几个月。" 提供 "完全托管、生产级、可定制的以太坊、Optimism、Arbitrum、Base、Mode 和 Zora 的 Rollup。"
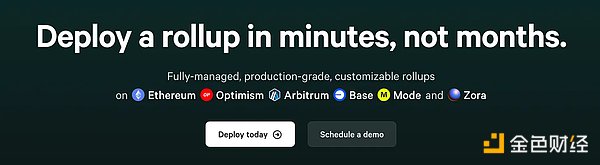
他们的登陆页面非常清楚地展示了使用Conduit创建Rollup有多么快速简单。
让我们在下面的步骤中进行一下了解。
创建一个Rollup
首先,在登陆页面上选择部署按钮,您将被要求创建一个账户和组织,然后立即被带到设置页面来部署您的第一个Rollup。
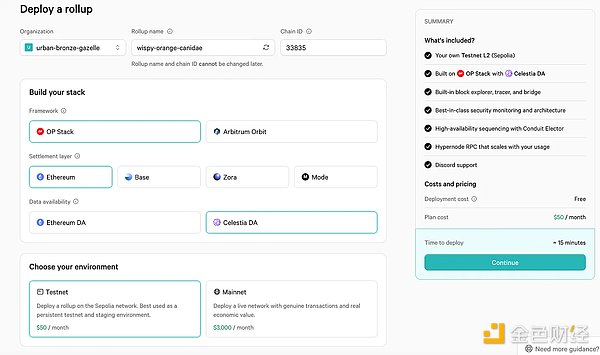
使用 Conduit 创建主网 Rollup 将每月费用为 $3,000,无论您是否需要主网 Rollup,您仍然可以使用测试网 Rollup 来开始,每月仅需 $50。
Conduit 允许您使用 Optimism 的 OP 堆栈或 Arbitrum 的 Orbit 堆栈。如果选择 Orbit,您会发现后续的选项也会相应更改。
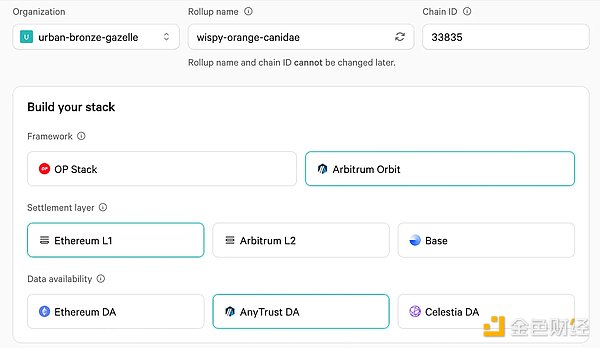
结算层是保证交易最终性和安全性的层,而数据可用性层是在任何给定时刻重建Rollup所需的信息的维护者。
两者都很重要,但作为一种简化解决方案,结算应该真正在像以太坊这样的更去中心化的区块链上,具有最高的金融安全性,而数据可用性可以在像 Celestia 这样的更集中的区块链上,该区块链支持以更低成本存储更多数据。
在我的测试网络示例中,我坚持使用了 OP 堆栈,使用以太坊作为结算层,Celestia 作为 DA。尽管如此,Conduit 允许您混合匹配这些,找到最适合您特定用例的方式。
当您继续时,您将被要求支付每月 $50 的费用。
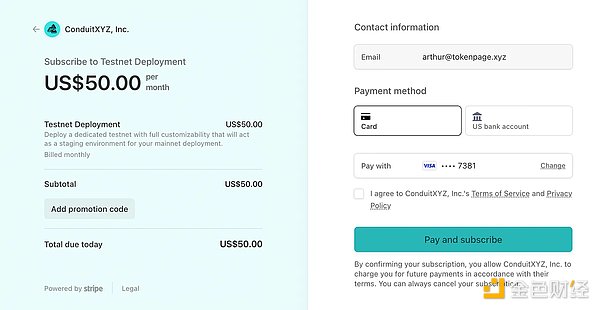
支付完成后,您就完成了!在几分钟内,您就配置了自己的第一个L2 Rollup。
您现在只需要等待 15-20 分钟,Conduit 就会设置好一切,一旦完成,部署将显示如下:
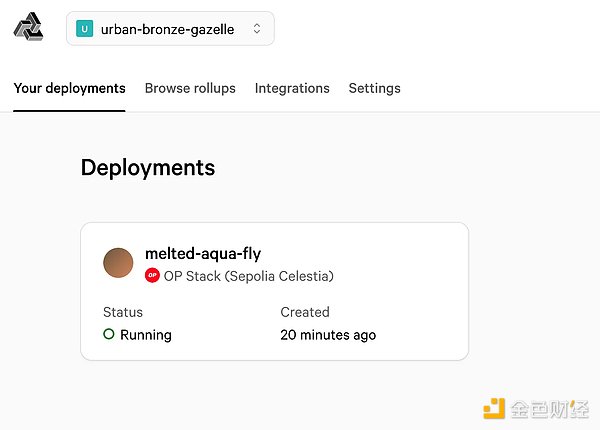
您的组织和 Rollup 的名称可以编辑。您现在可以开始使用您的新L2 Rollup了!
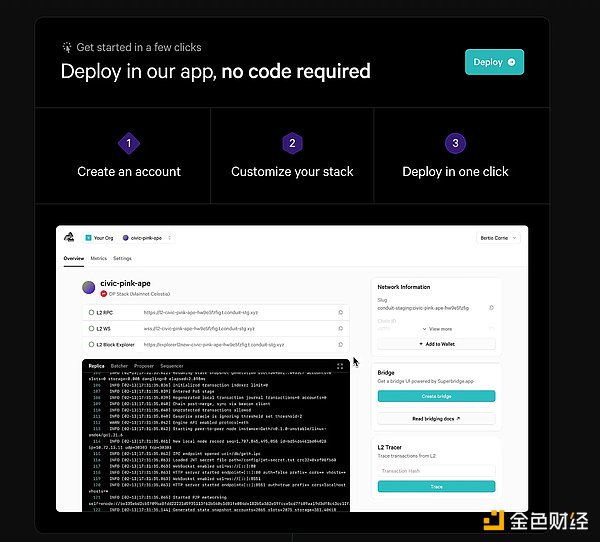
开始使用您的Rollup
在部署页面选择您的Rollup后,Rollup 信息将显示如下:

Rollup 配置设置显示在右侧,黑色终端框中的输出表示L2正在运行。目前您不需要真正理解输出的含义,您所需要看到的是它持续更新。
您需要选择 "添加到钱包" 将网络添加到您的 Metamask 或等价钱包中。
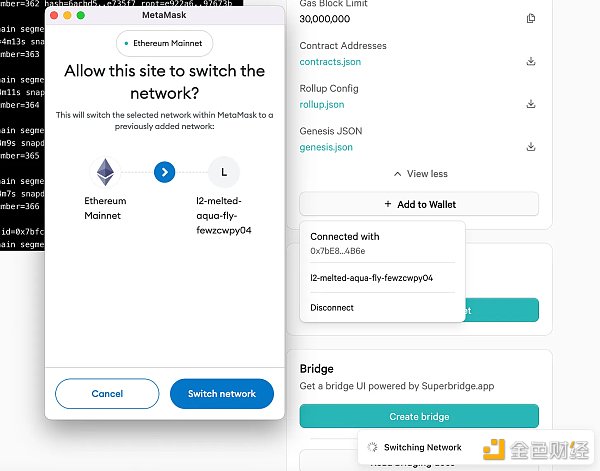
然后,您应该在桥接部分点击 Create Bridge",这将打开一个名为 SuperBridge 的桥接软件。
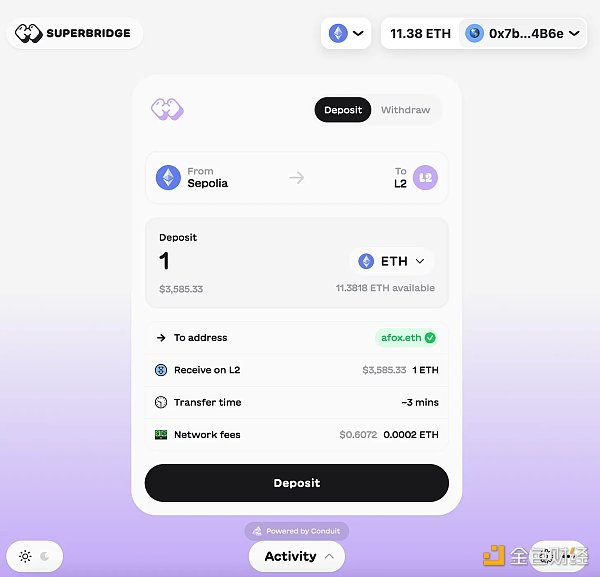
由于我们在测试网络上,您将能够将 Sepolia ETH 桥接到您的新 Rollup 上。如果您没有任何 Sepolia ETH,您可以从这个水龙头获取。
我几次桥接了超过 1 ETH,最终在我的新L2 Rollup上得到了 2 个测试网络ETH,在我的Metamask钱包上可以看到!
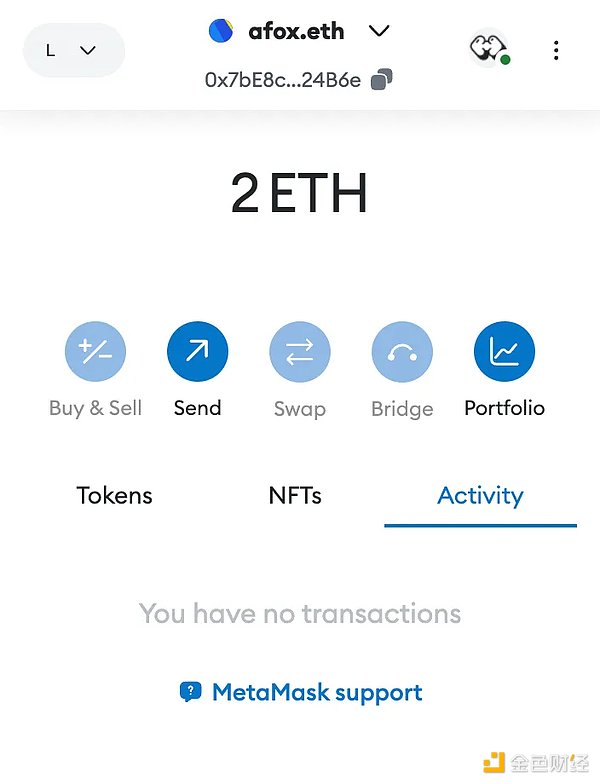
现在,您已经将测试网络ETH桥接到了您的新Rollup上,您可以开始使用它了!
进一步使用您的Rollup
现在您拥有了自己的L2 Rollup,您可以直接部署代码到其中。
首先打开 Remix IDE,我已经在我的名为“编写您的第一个智能合约”的教程中解释过如何使用它。
然后将下面的代码复制到 Remix 中的一个新文件中。
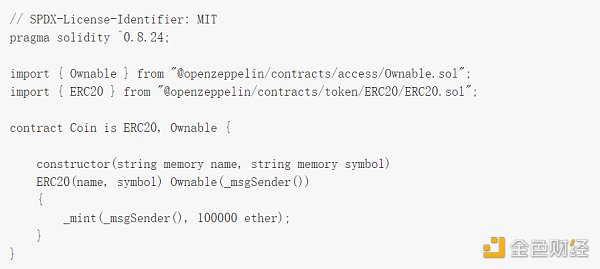
将环境更新为“Injected Provider”,并将您的 Metamask 设置为新的 Rollup。在橙色部署按钮旁边给您的代币命名和符号,在这种情况下,我写了“Dog, DOG”,然后点击部署。
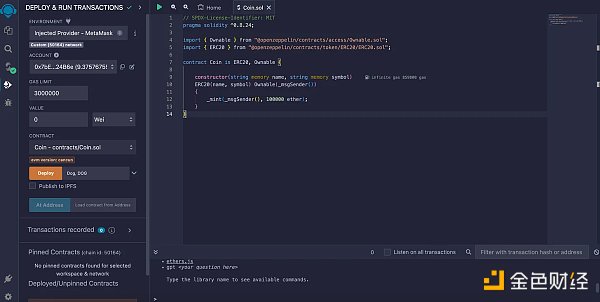
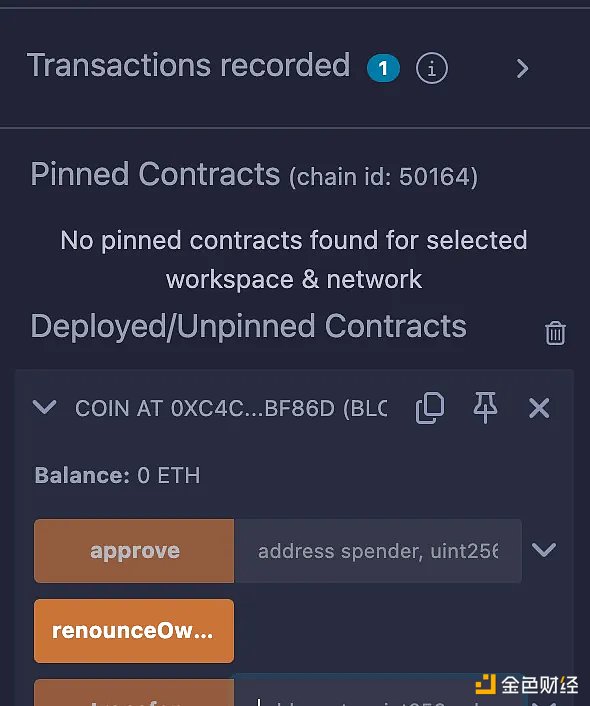
您将需要在 Metamask 中签署此交易,当交易被处理时,您将刚刚在您的新L2 Rollup上创建了一个新代币,这酷了!
如果我打开Metamask,我可以通过复制 Remix 中创建的合约地址将该代币添加到我的钱包中。
这样做后,我可以看到我的新Dog代币的余额为100000 DOG。在Metamask中,我可以将100 DOG发送到网络上的另一个地址。
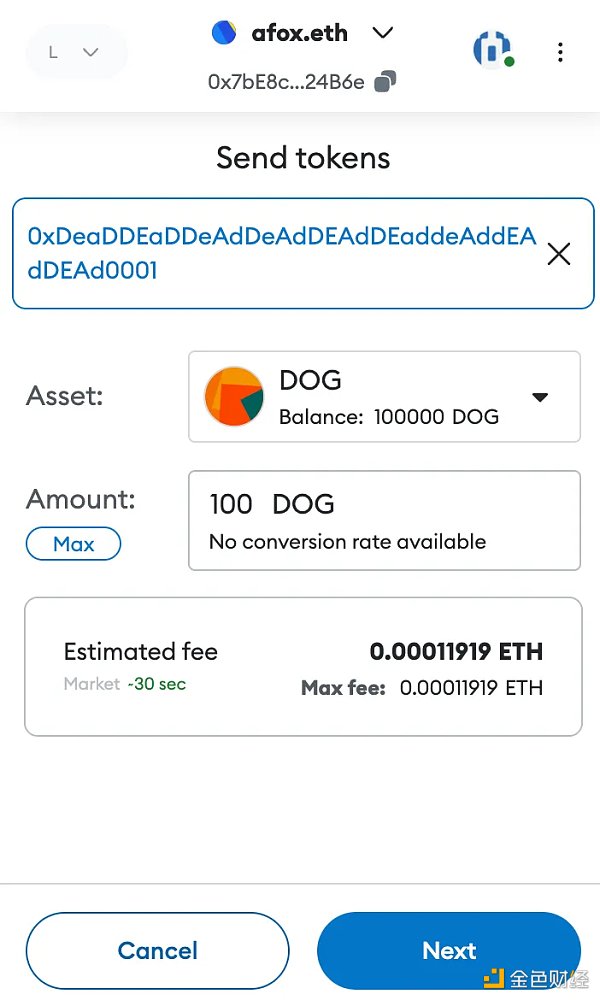
多么惊人,我们不仅刚刚创建了我们自己的Rollup,还在这个新区块链上创建了我们自己的Dog代币并将其发送到这个新链上的另一个账户。
集成
正如您所看到的,您可以在您的新L2区块链上做任何您想做的事情,比如创建自己的代币、智能合约和dapp。
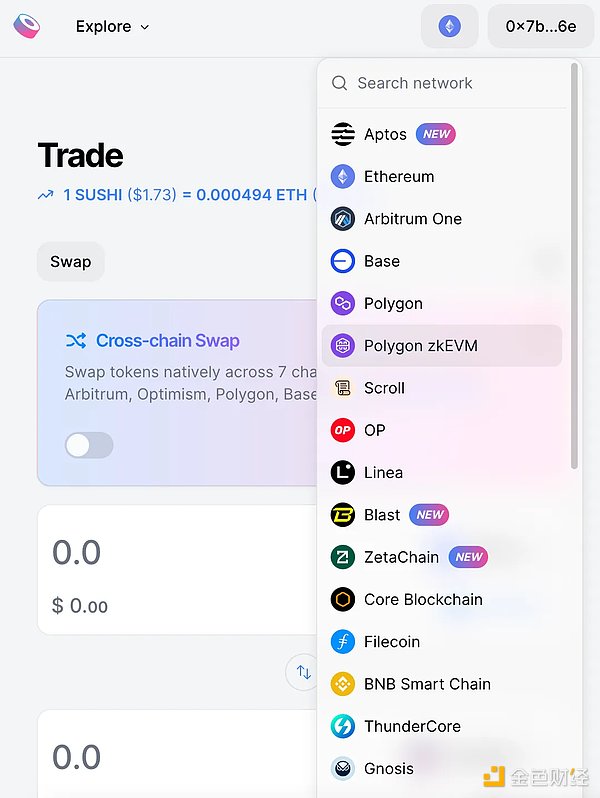
您可以拥有从简单代币到像Sushiswap这样的复杂AMM运行在您的Rollup上,正如我们看到它在几个链上运行的一样。
对于与不同项目的这种集成,Conduit 有一个集成页面,帮助您将这些应用程序部署到您的新Rollup上。
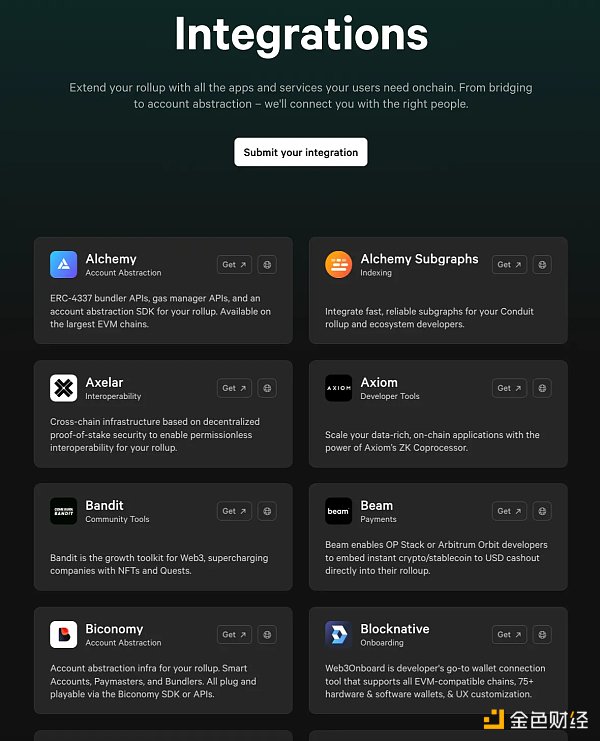
当您在此页面上选择任何dapp上的“Get”时,一个类型表单将弹出,您可以解释为什么要将此dapp与您的Rollup集成。
拥有这样一个与数十个最受欢迎的dapp之一交流的简单界面,对于启动一个全新的Rollup来说是一件非常有帮助的事情。
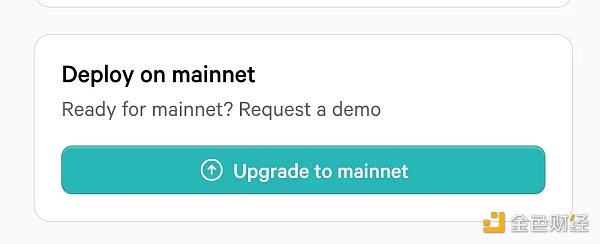
当您对您测试的所有内容满意时,您可以将Rollup 迁移到主网。但是,升级每月需要 3000 美元,并且您需要安排与 Conduit 的演示以使其生效。
在 Explorer 上确认我们所做的事情
在尝试了我的新测试网Rollup后,我可以通过跳入 Conduit 也为您设置的区块浏览器来确认发生的一切。
例如,我可以回到浏览器并查看我的地址,以查看已完成的交易和我拥有的代币。
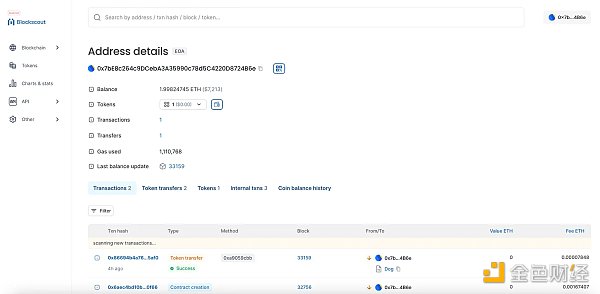
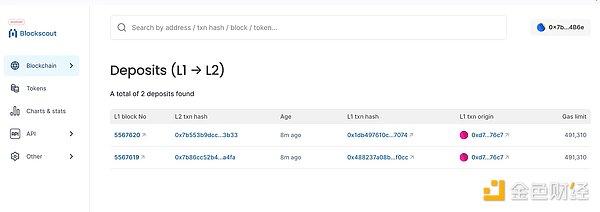
通过在左侧选择区块链选项卡,然后单击“Deposits (L1->L2)” 之类的选项,我可以获取更多特定于区块链的信息,在这种情况下,您可以看到我桥接的 Sepolia ETH。
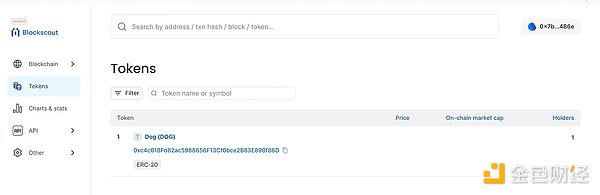
在选择代币后,我还可以看到我部署的新DOG代币。
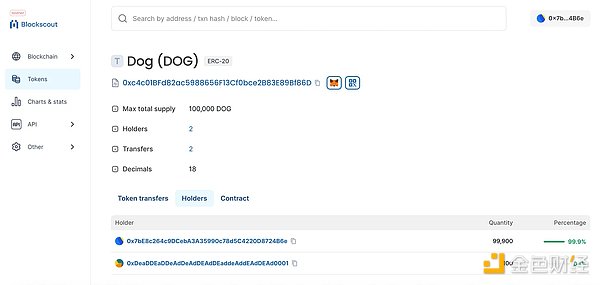
我们可以更深入地研究此代币,并查看有两个持有者,因为我将100 DOG发送到网络上的另一个账户。
我相信很明显,我只是初步探索了拥有自己的新Rollup所能实现的功能的表面。在未来的帖子中,我可能会深入探讨不同的用例。
最令人着迷的是,由于使用RaaS已经变得轻而易举地创建Rollup,因此L2很可能会变得普遍化,将会有成百上千个存在。
那么,真正的问题将是如何将您的L2 Rollup与其他的Rollup区分开来?
The abstract of this article compiled by the author is a new business model that allows anyone to create and deploy their own without coding. It is a very easy-to-use provider. Below you will see how fast and simple it is to run the Ethereum virtual machine with a few clicks. When yours is active, you can connect the bridge to it and deploy smart contracts. For example, I created a token called and transferred it, and set up a block browser for you, so you can easily go on the chain. Visualize all the contents of the text. Because the main network of Ethereum has become too slow and expensive, we have seen the growth of Ethereum, most of which is what I discussed before. We need to understand the blockchain relatively deeply, but the recent growth of providers means that you can deploy one in a few minutes without writing a line of code. In this paper, I will discuss the working principle of Ethereum by observing it a little, and as Ethereum seeks to expand to handle more transactions every second, the first-layer solution keeps growing. In the past articles, we have studied that it is the most popular type in today's Ethereum. Let me briefly remind you that it is a single blockchain that executes transactions and then publishes versions back to the main chain. There are hundreds of examples as shown in the following figure, which teach you how to use creation. However, despite the emergence of chains such as and, they have created their own toolkits to create faster, but creating their own is still not a trivial matter and requires certain technical knowledge. In addition, you need to run nodes to support this. It may also become complicated. This challenge has given birth to a new type of business, that is, to provide services that anyone can create and deploy their own in a few minutes by pressing a few buttons, and then start to bridge and run smart contracts on their own platforms. Next, I will show you how simple it is to use and create. There are already many competitors, including waiting for this article. I find it very fast and easy to get started. According to them, you are allowed to deploy one in a few minutes without. It is a few months to provide full hosting of the production-grade customizable Ethereum and teach you how to use it. The landing page of creating them clearly shows how fast and simple it is to use creation. Let's learn how to use creation in the following steps. First, select the deploy button on the landing page, and you will be asked to create an account and organization, and then immediately be taken to the setup page to deploy your first hand to teach you how to use creation. Whether you need the main network or not, you can still use the test network to start with the stacks or stacks that you are only allowed to use every month. If you choose, you will find that the subsequent options will be changed accordingly, and you will be taught how to use the creation settlement layer, which is the layer to ensure the finality and security of the transaction, while the data availability layer is the maintainer of the information needed for reconstruction at any given moment. Both are important, but as a simplified solution, the settlement should really be in a place like Ethereum. A more decentralized blockchain has the highest financial security, and data availability can be achieved on a more centralized blockchain like this. This blockchain supports storing more data at a lower cost. In my test network example, I insisted on using the stack and using Ethereum as the settlement layer. Nevertheless, it allows you to mix and match these ways to find the most suitable way for your specific use case. When you continue, you will be asked to pay a monthly fee and teach you how to use it. After the payment is completed, you will finish it. In a few minutes, you have configured your first one. Now, you just need to wait for a few minutes and everything will be set up. Once the deployment is completed, it will be displayed as follows: teach you how to use the name of the organization that created you, and you can edit it. Now you can start using your new one, and start using your post-deployment page. The information will be displayed as follows: teach you how to use the output displayed in the black terminal box on the right to show that it is running. At present, you don't need to really understand the output. What you need to see is that it is constantly updated. You need to choose to add it to your wallet, add the network to your wallet or equivalent wallet and teach you how to use it. Then you should click on the bridging part. This will open a bridging software called "Bridging Software" and teach you how to use it. Because we are on the test network, you will be able to connect the bridge to your new network. If you don't have anything, you can get me from this faucet and bridge it several times. Finally, I got a test network on my new network. I can see on my wallet how to teach you how to use the creation by hand. Now that you have bridged the test network to your new platform, you can start to use it further. Now that you have your own, you can directly deploy the code into it. First, I have explained how to use it in my tutorial entitled Writing your first smart contract, and then copy the following code to a new file in to teach you how to use the creation by hand, update the environment to and set your settings. In this case, I wrote the name and symbol of the token next to the orange deployment button, and then click on the deployment button to teach you how to use it. You will need to sign this transaction in the middle. When the transaction is processed, you will just create a new token on your new website. This is cool. If I open it, I can add the token to my wallet through the contract address created in the copy to teach you how to use it. After doing so, I can see the balance of my new token for me. We can send another address on the network to teach you how to use it. It's amazing that we not only just created our own, but also created our own tokens on this new block chain and sent them to another account on this new chain for integration. As you can see, you can do anything you want on your new block chain, such as creating your own token smart contract and you can have something from simple tokens to complex operations like this on your website, as we see. As it runs on several chains, it teaches you how to use it. For this integration with different projects, there is an integration page to help you deploy these applications to your new platform and teach you how to use it. When you select any platform on this page, a type form will pop up. You can explain why you want to integrate this with your platform. It is very helpful to start a brand-new one. When you are satisfied with all the contents you have tested, you can migrate it to the main platform. 比特币今日价格行情网_okx交易所app_永续合约_比特币怎么买卖交易_虚拟币交易所平台
注册有任何问题请添加 微信:MVIP619 拉你进入群

打开微信扫一扫
添加客服
进入交流群
1.本站遵循行业规范,任何转载的稿件都会明确标注作者和来源;2.本站的原创文章,请转载时务必注明文章作者和来源,不尊重原创的行为我们将追究责任;3.作者投稿可能会经我们编辑修改或补充。